Journal Articles
| Browse in : |
All
> Journals
> CVu
> 166
(12)
All > Topics > Programming (877) Any of these categories - All of these categories |
Note: when you create a new publication type, the articles module will automatically use the templates user-display-[publicationtype].xt and user-summary-[publicationtype].xt. If those templates do not exist when you try to preview or display a new article, you'll get this warning :-) Please place your own templates in themes/yourtheme/modules/articles . The templates will get the extension .xt there.
Title: Wx - A Live Port
Author:
Date: 03 December 2004 13:16:10 +00:00 or Fri, 03 December 2004 13:16:10 +00:00
Summary:
Body:
The process of connecting the user interface to code is very similar to MFC. The event table is as follows:
ON_COMMAND(ID_VIEW_SOUNDINGS, OnViewSoundings)
ON_UPDATE_COMMAND_UI(ID_VIEW_SOUNDINGS, OnUpdateViewSoundings)
EVT_MENU(ID_SOUNDINGS, WXWindPlotView::OnViewSoundings)
EVT_UPDATE_UI(ID_SOUNDINGS, WXWindPlotView::OnUpdateViewSoundings)
For clarity I put the message/event handlers in the class that will actually be handling it - this is the way the class wizard built the application in the first place but this is not the a requirement. Class wizard builds the event table with a few mouse clicks. Under wxWidgets you have to code it manually, however there is very little work to do.
As with MFC the wxWidgets framework handles the UI changing in idle time.
Here is the implementation of the code:
void WXWindPlotView::OnViewSoundings() {
  WXWindPlotDoc* doc
              = (WXWindPlotDoc*)GetDocument();

  if(!Soundings->DepthFilePresent) {
    wxMessageBox("Ocean depth features require
                 Registration and the Xaxero
                 CD ROM.\nVisit www.xaxero.com
                 for details.");
    return;
  }

  if(bSound)
    bSound=FALSE;
  else
    bSound=TRUE;
  doc->UpdateAllViews(NULL,NULL );
}

void WXWindPlotView::OnUpdateViewSoundings(
                     wxUpdateUIEvent& event) {
  event.Check(bSound);
}
Almost identical to MFC - however one little pitfall to be careful of. If you want to set a check in an item make sure you have set it to checkable in the wxDesigner properties panel or you will get assertion errors in debug.
Like MFC, wx allows an array of classes with its own dynamic array allocation. Here I am trying to define an array of email addresses.
Prior to the class that defines an email message we define an array container for the addresses:
WX_DECLARE_OBJARRAY(wxSMTPAddress,
                    arr_Recipients);

class Message {
  ...
  arr_Recipients
              Recipients;
};

#include <wx/arrimpl.cpp>
// this is a magic
// incantation which must
// be done!

WX_DEFINE_OBJARRAY(
         arr_ToRecipients);
I left the comment in the include statement. I had link errors when the WX_DEFINE_OBJARRAY was left off and so after reading the wxArray section of the documentation fully it all started to make sense. More important - I went to a clean compile and link.
Using wxDesigner (see Figure 1) you lay out your dialog.
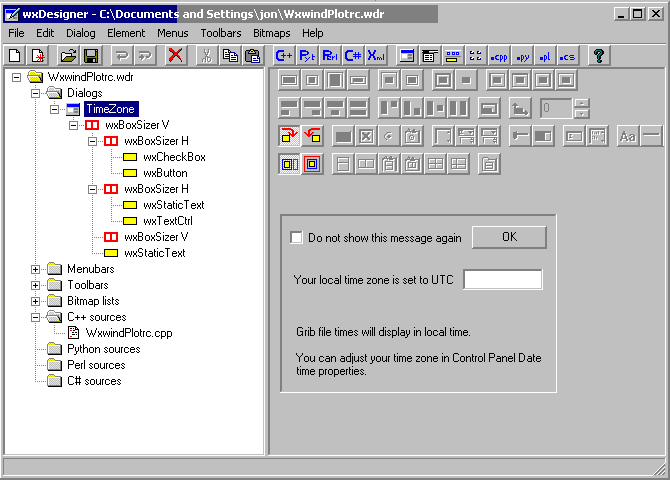
This simple example shows how 3 layers of vertical sizers encapsulate a box. The top two layers are horizontal sizers with adjacent controls. The hierarchy is a little tricky at first but when you have the hang of it, design goes really fast.
As you create the controls you will be giving them resource names similar to MFC. Now comes the tricky bit - to generate the code.
For the whole project I am using one wdr file containing all my dialogs, tool bars, etc. When you press the C++ button the code is written to wxwindplotrc.cpp that has the low level hard to read stuff that does the actual painting of the resources.
We need to generate a dialog implementation class now. We press the .cpp button to add a C source. Give it a name (remember to add the suffix .cpp)
This will generate an empty C++ container.
We now need to implement a class for our dialog. Easy enough. Press the Class button (see Figure 2).
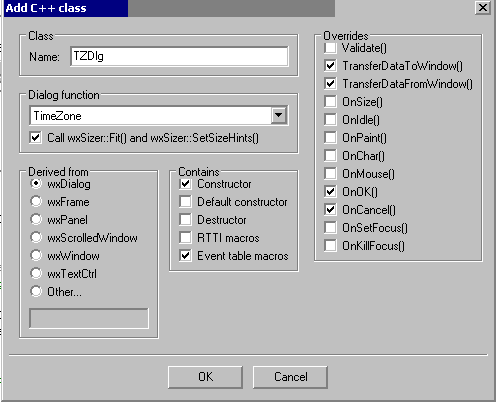
We have added the handlers on the right - everything we wanted our dialog to do. We respond to either the OK or the cancel messages and we have handlers to move data to the dialog and out of it.
That is all there is to it - a shell is created that will compile and run. It will not do anything yet though.
We have two ids that we wish to manipulate from the code.
-
A check box: ID_TZCHECK
-
An edit box: ID_TZDISP
We need to add inline functions to read and write from these ids.
Press the Get button on the source code editor to add the get functions:
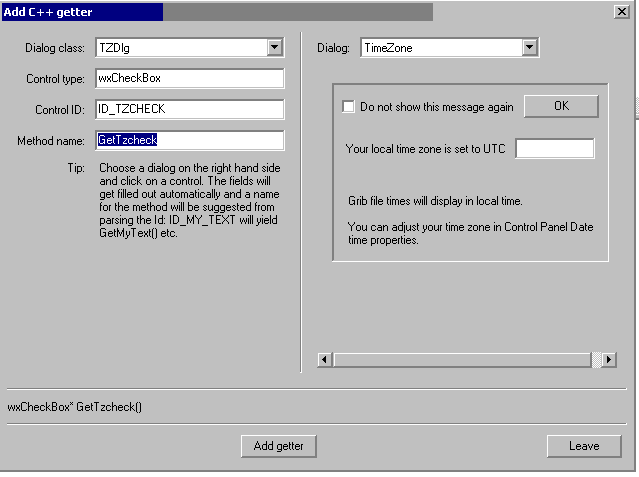
Select the dialog you wish to use and press on the field you want to allow reading and writing from.
The program will select a method name. You can alter this if you like. The Add getter button places it in your code. Now we have:
// WDR: method declarations for MyDialog
-> wxCheckBox* GetTzcheck() { return
      (wxCheckBoxl*) FindWindow(ID_TZCHECK); }
-> wxTextCtrl* GetTzdisp()  { return
        (wxTextCtrl*) FindWindow(ID_TZDISP); }
So far wxDesigner has been doing all the work for us. Now we have to roll up our sleeves and start writing code.
Before we leave the header file we need to add variables to hold our values. A wxString - DispUTC and BOOL Check.
In the code we need to connect this to actions.
Look at the constructor - the first line should connect the dialog resource name to code. The first line of the constructor is generated as:
MyDialogFunc(this, TRUE);
Double-check this is what you want. Normally a meaningful name is generated as specified. This will be in the constructor of the generated source file.
Next we go to the following functions and flesh them out.

bool MyDialog::TransferDataToWindow() {
  // wxDesigner has added two getters, used to
  // set the values on startup and retrieve them
  // when closing the dialog (next method).
  GetTzdisp()->SetValue(DispUTC);
  GetTzcheck()->SetValue(Check);
  return TRUE;
}
bool MyDialog::TransferDataFromWindow() {
  DispUTC = GetTzdisp()->GetValue();
  Check = GetTzcheck()->GetValue();
  return TRUE;
}
There we are - a fully working dialog.
You can include a bunch of dialogs in one chunk of source code - useful for keeping wizard and notebook pages together.
In your code include the tzdlg.h file and a calling subroutine in the header of the calling program and create a call in the body.
Invoke the dialog as follows:
TZDlg dialog(GetMainFrame(), -1,
             wxT("Time Zone Display"));
... Initialization
dialog.ShowModal();
As easy as that !
wxWidgets: www.wxwidgets.org
wxDesigner: www.roebling.de/
Another introduction to wxWidgets: www.all-the-johnsons.co.uk/accu/index.html
Porting MFC to wxWidgets: www-106.ibm.com/developerworks/linux/library/l-mfc/
Notes:
More fields may be available via dynamicdata ..